DEVELOPERS
JAVIER ROLLON MORAN
3D Artist
Before becoming a part of RAS I was in the TV industry making some 3D advertisements with Alias power Animator, and later, animations for the Cheshire cat from Alice in Wonderland for DisneyQuest in a company called SiliconArtist; as some internet stuff (web pages, VRML, etc.). Before getting into RAS I got in touch with video game developers in Spain ( PyroStudios and RAS), and in the rest of the world ( Westwood ,Electronic Arts,...); all of these made via internet. I made some tests before getting inside, and now I am another member of 18 people, working hard on developing one of the better games ever seen on the screens.
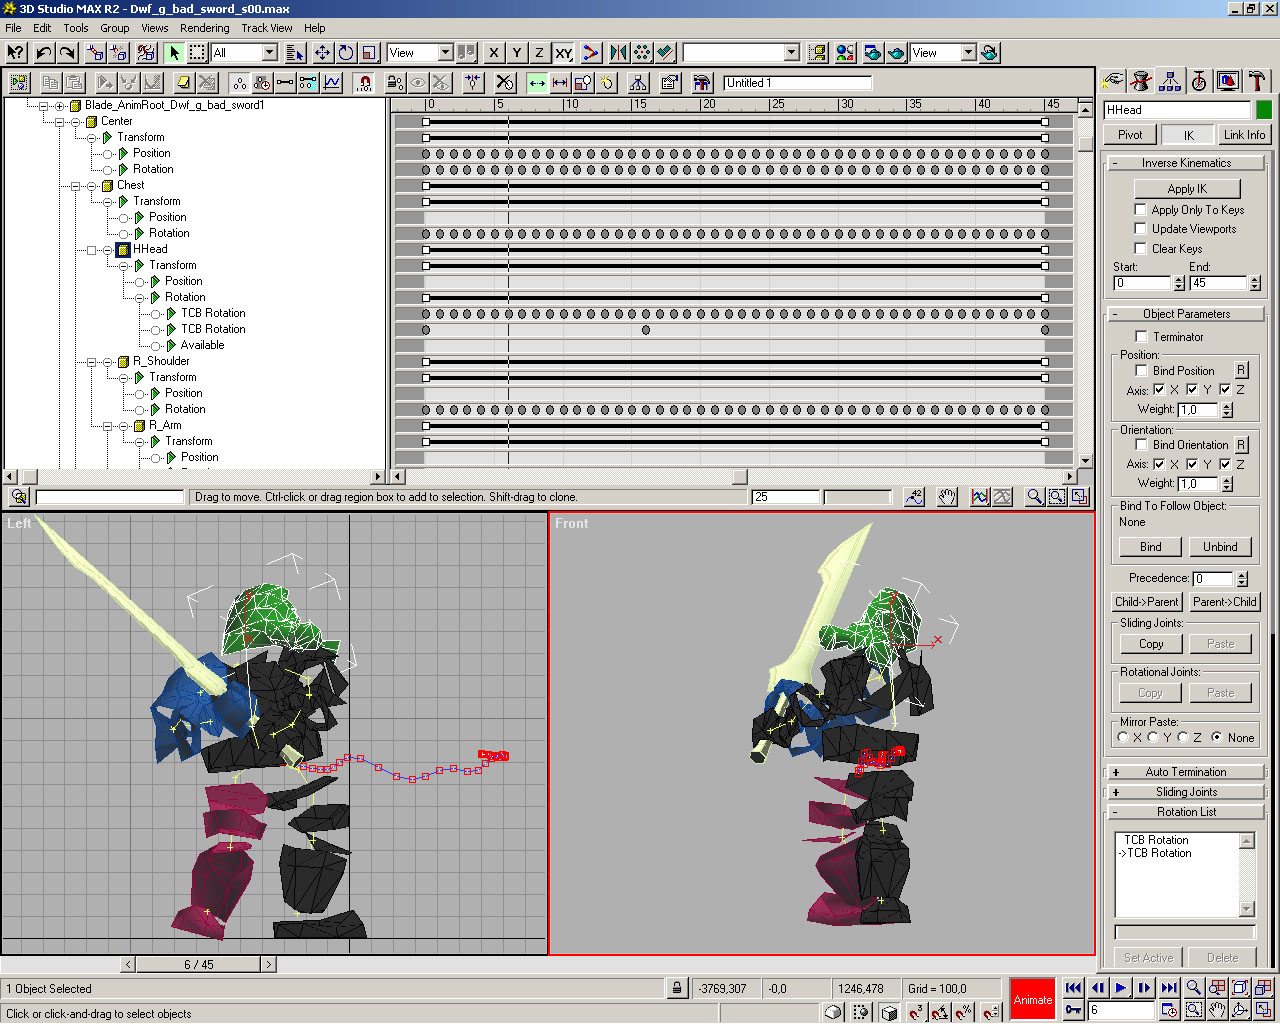
This is the way we work in 3D Studio Max 2. I like this layout; 3 Windows: The upper one is the track view and lets us easily see where the keyframes are. The dots are the keyframe of every object of the body, and as you can see they are only in the rotation field (The center object, also motion field). The keyframes are the position (in this case an angle) of the object in one moment of an animation. For most animations we put a frame rate of 20 frames per second (From 0 to 20 represents 1 second of movement, from 0 to 40, 2 seconds....). The Black lines are only markers to make an easy way of moving those keys.
The bottom ones is the 3d-views, and we always put the left (or right) and front views of the model in this 3d-view. RAS have made some plugins for MAX, not for working but for exporting animations, models or importing maps (to take reference where our characters are putting the feet).
The most time consuming part, is animating a model. Making a model takes two weeks, while animating it can take 2 moths. In this game, nowadays we have 1500 animations so, making them all by hand is a huge work to do. That is why we chose the motion capture system, as well as the feeling it gives to an animation, making it more realistic.
When a model is finished, we make the skeleton of that model. This skeleton defines the form for the pieces that cannot be deformed. You can see these pieces in the picture when you look at the Dwarf, and you can see that there are other faces that are not there. The engine draws these faces later. The visible pieces are linked to each other forming a tree, where its parent is the center of the body, and the children are the head, hands and feet. The body of the model consists of 25 parts, and two parts for the swords. We use two parts for the swords because they guide us in fitting both the hands well.
Later, we go to a motion capture studio where an actor put a suit with a lot of ball-markers, and 10 cameras record all his movement. With a plug-in for 3DStudio Max, made by Angel Cuñado, we import this movement file into the main character (in this case, the Dwarf). From this point we have two types of movement: looping movements (walking, running, relax...) and non-looping (deaths, strikes, jumps...).
In RAS we have to make them loop-able and clean the imperfections in the movement. Some times, when Jose Luis Vaello (Art Director) doesn't likes a movement, we have to correct them, and sometimes it's better to make it by hand completely, than try to use that motion capture movement. There are also enemies that cannot be done by motion capture: Birds, Wyverns, spiders, demons and other monsters that I cannot tell (surprise... heh)
Sometimes, other models can share an animation if they have the same body proportions. If not, we have to convert that animation to the others. For example: in one hand weapon movements, that movement don't depend in the type of sword the character has, its always the same, and some movements of the Barbarian (one hand movements) are shared with the Dwarf, or Amazon. But in our game each character has a speciality: The Knight is expert in the usage of one handed swords, so he is the only owner of a special set of animation and combos. The Barbarian is the only one that can make well movement with swords held by both hands, etc. What happens if I choose the Dwarf (it's my favorite. Looks funny), and I find a DeathSword (name of the weapon in the picture)? I can carry it, but when I hit the fire button, it doesn't show a well-done movement, it makes a sluggish movement. That is the attack in the picture. That's why it is called " Dwf_g_bad_sword".
The yellow lines form the connection between parents and children in the link hierarchy. The "+" is the pivot of each object, and is where each object can be rotate around. All objects can only have rotation keyframes except the center one that can also have moment keys. The yellow lines are only visual helpers in Max.
From the beginning of my work here in RAS, the only work I have done is animation. Well, at the end of the game I am taking part of the model of some characters in the game, in high polygon count for marketing. Luis Miguel Quijada and Daniel Delgado are the people who have modeled most of the enemies and characters. Daniel has been here from the beginning of Blade and he has done both modeling and animating. Luis Miguel modeled the Dwarf.
The right panel is the Inverse Kinematics (IK) menu. IK is a way of moving objects in hierarchies. When I apply IK and I move a foot, the parents of that foot moves accordingly, until the parent stops, by putting a Terminator modifier to it (in the right panel). Imagine that you have a character in a relax movement, and his leg come out bad and introduce it into ground. How do you fix this? Easy! Using that panel I put the numbers of the start and end of the animation where you want the leg to stay in place. Mark the center as a Terminator, and the foot as Bind Position and Bind Orientation. Then press the Apply IK button, and it's fixed!!! Bind means to make an object stay in place and orientation
When we finished the movement in MAX (or think that we have end the movement), we export the movement to the game, and test it. Now we have Direct3D and OpenGL, but before we needed two monitors to put it into Glide.
The blue line, with the red boxes, is showing the line of motion for an object. The boxes are measuring the amount of time between the frames. The boxes are only shown for the motion keys, none for the rotation keys; each box is put in every key of the animation (20 keys, 20 boxes), and when a lot of boxes are together then the movement is slower. Sometimes, if we have 100 frames with 2 keys, one at the 0 frame and the other at the 100, but the position is very different, the animation can be slowly. It is a great help for us to make the movement smoother.
Normally we don't work in shaded mode. We use wireframe mode (it's quickly), but we use the shade mode to see that none of the body parts move inside other parts of the body.
As an anecdote must say that when we were in Sheffield making motion capture, the actor was ill. So I had to put on the balls (mocap equipment), and made all the sets of motions of the Minotaur (bull look-alike creature), so when you'll see a Minotaur in the game, you see me. You see: Spain= Bulls; It's our destiny, heh.